Date and Time are part of almost any dataset data scientist, data engineer, or data analyst will work on, so knowing how to handle this kind of data is a crucial skill that will save you a lot of time and effort. In this tutorial, we will discuss various methods of handling dates and times in Python using pandas.
Why handling date and time is so important?
There are various reasons behind the importance of dates and times in any data in general that can be listed as follows.
- Most of our data are connected to time, and it’s essential to know the time of an event for some data. For example, click rate data, banking transactions, sensors’ readings, and medical records data.
- Sometimes we may find some adjacency between some event and some date components like the number of days in a week, number of weeks in a year, number of months, hours, minutes, or difference between two timestamps.
For the reasons above and more, we need to enhance our skills in dealing with dates and times, and we will do it using examples. Let’s see how. For this demonstration, we will use the bike dataset found through this Kaggle competition. Bike Sharing Dataset
Now, let’s start by importing pandas and reading our data.
#Importing pandas and loading our dataset
import pandas as pd
rides = pd.read_csv('bikes.csv')
Now we can use the head method from Pandas library to take a sneak peek at the data how it looks like

# View the head
rides.head()
You might have noticed that we have four columns that contain date and times in different formats:
- Start date time is given in full format (day, month, year, hour, minute)
- End date time is given in full format (day, month, year, hour, minute)
- Creation Timestamp time is given in UNIX format ( we will talk about it later)
- Licence Date time is given in long format ( day in characters, month in characters, day in numbers, year in numbers)
Next, we need to check what data types have been assigned to these columns, and to do that, we will use the info method from the Pandas library

#Let's check the columns and their datatype
rides.info()
As you see, all the date columns are imported as strings or integers. We will try to convert them to DateTime objects by using to_datetime(), a method used to convert any column to DateTime format it accepts many arguments and we will talk about the most important ones.
format
This argument tells our method what is the format of the date we are trying to convert. It’s based on a famous database for parsing DateTime objects in many programming languages. It’s called Strftime you can explore its documentation through this link strftime
unit
It expresses the unit of our date (We will see its value when handling the UNIX DateTime format) No, let’s begin by converting Start Date, End Date, and License Date to DateTime objects
We will start the conversion process with the Start_date column
rides['Start date'] = pd.to_datetime(rides['Start date'], format = "%m/%d/%Y %H:%M")Let’s investigate how we used our format in the format argument.
First, I began by looking into the dates and see how they are represented then I went to strftime documentation to see what symbols match the interpretation of the date and here is what I have got:
- %m Month as a zero-padded decimal number.
- %d Day of the month as a zero-padded decimal number.
- %Y Year with century as a decimal number.
- %H Hour (24-hour clock) as a zero-padded decimal number.
- %M Minute as a zero-padded decimal number.
Let’s check data types again to ensure the Start date column is now converted.
rides.info()
You can see it’s now in the correct data type. Let’s convert the End date column and see.
rides['End date'] = pd.to_datetime(rides['End date'], format = "%m/%d/%Y %H:%M")
rides.info()
Perfect, now we will convert the License Date (try to find the correct strftime format before proceeding)
rides['Licence Date'] = pd.to_datetime(rides['Licence Date'], format= '%A, %B %d, %Y')Let’s check the data types as usual
rides.info()
Looks good, License Date is now in datetime
UNIX Timestamp
UNIX timestamp is a proper representation of the DateTime object. It’s simple and more straightforward in processing through CPUs. Besides, it takes much less storage capacity. How is it measured?
Simply, it’s the total elapsed period since the epoch. In other words, it’s the period between our target date and 1/1/1970 12:00 Although the UNIX timestamp has tremendous benefits, it lacks a crucial aspect. It’s not human-readable. Once you look at a date written in UNIX format, you will not be able to figure out the day of the year or the hour or anything until you convert it.
In general, it is denoted by the total seconds since the epoch but in some critical applications that require high precision. It may be denoted in nanoseconds. Here, you will realize the importance of the unit argument in the pd.to_datetime() method
Now, let’s convert our License Date column
Now we will handle the Creation Timestamp which is written in UNIX format
rides['Creation Timestamp'] = pd.to_datetime(rides['Creation Timestamp'], unit='s')
rides.info()
Timezones
Timezone is a crucial aspect when dealing with dates and times. That’s because some countries may lag or lead others in their time. For example, the USA is 7 hours behind Egypt. If the time in Egypt is 3:00 PM, it will be 9:00 AM in the USA at the same moment. These differences require some attention when dealing with dates and times.
When converting any column to the DateTime format, we have to ask ourselves about the correct timezone as it will affect the conversion.
A great approach to deal with this is the Tz database. It’s used by many programming languages to handle dates and times based on their corresponding time zones.
Now, let’s assume that the Creation Timestamp column was recorded according to the America/New_York timezone and we want to enforce pandas to convert it according to this timezone.
We will use dt.tz_localize method that accepts only one argument: our timezone.
rides['Creation Timestamp'] = pd.to_datetime(rides['Creation Timestamp']).dt.tz_localize('America/New_York')
rides.info()
Universal Time Coordinates (UTC)
Because of time zones’ variations, the need arises for a referencing system that should be unified for every country. In other words, we need a coordinates system that makes the time in Egypt, and the USA is the same at the same moment without any lagging or leading action.
UTC is a conversion that must be done to all given timestamps in any dataset to make sure that we are not ignoring any time zones differences.
We can use tz_convert to do this task. Let’s see how can we convert the Creation Timestamp to UTC.
rides['Creation Timestamp'] = rides['Creation Timestamp'].dt.tz_convert('UTC')
rides.info()
You have now noticed that we finally got our Creation Timestamp column in the UTC timezone.
In this section, we will discuss techniques that are very important when it comes to DateTime feature engineering.
Difference Between Two Dates
As we have the Start date and End date we can subtract them and see the total time of each trip.
rides['duration_in_minutes'] = rides['End date'] - rides['Start date']
rides.head()
rides.info()
By now, you can see our newly created column. It’s in timedatelta format which is a special data type when using differences between dates. Let’s try to add a new column with the total trip time in seconds.
rides['duration_in_seconds'] = rides['duration_in_minutes'].dt.total_seconds()
rides.head(5)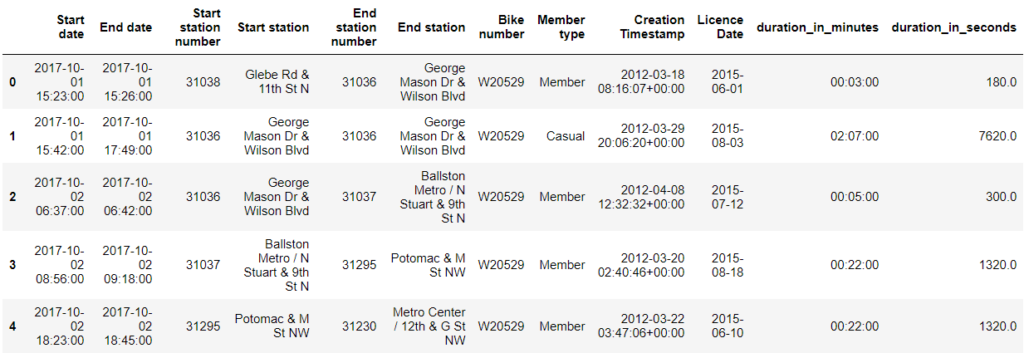
By now, you can answer some simple questions about trips such as the mean and min trip time
Extract Date Components
Now, we will work on extracting some features out of any date. We will be working with the Licence Date column and we will try to extract some useful features such as year, month, number_of_week, weekday_name, and more! Let’s start by the year.
rides['licence_date_year'] = rides['Licence Date'].dt.year
rides.head()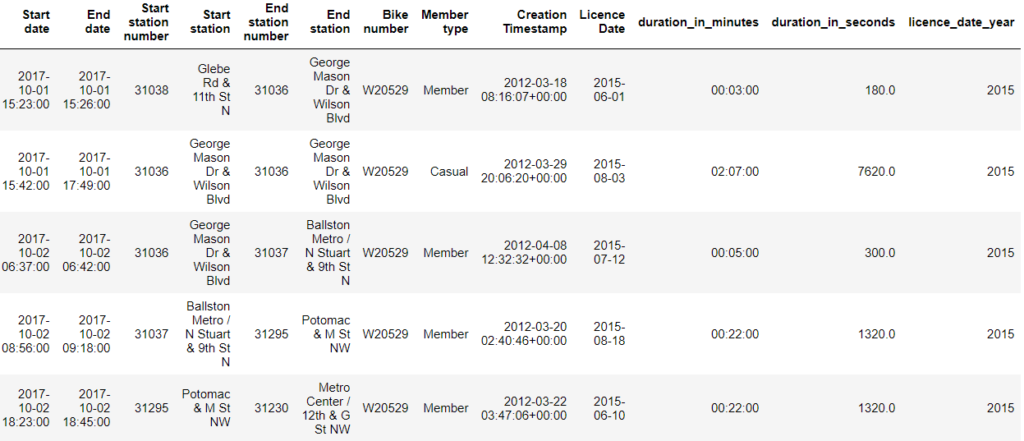
Let’s now check Month value
rides['licence_date_month'] = rides['Licence Date'].dt.month
rides.head()
Let’s now check the Day value
rides['licence_date_day'] = rides['Licence Date'].dt.day
rides.head()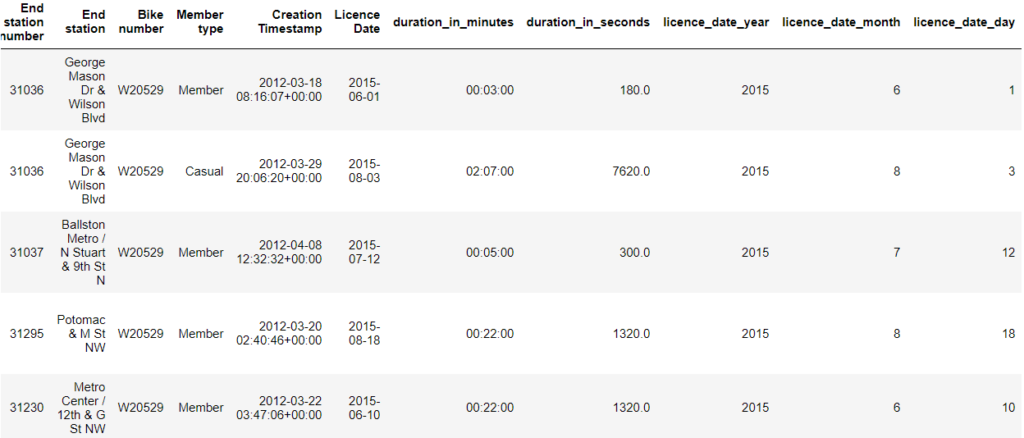
Let’s now check Week Day value
rides['licence_date_weekday'] = rides['Licence Date'].dt.day_name()
rides.head()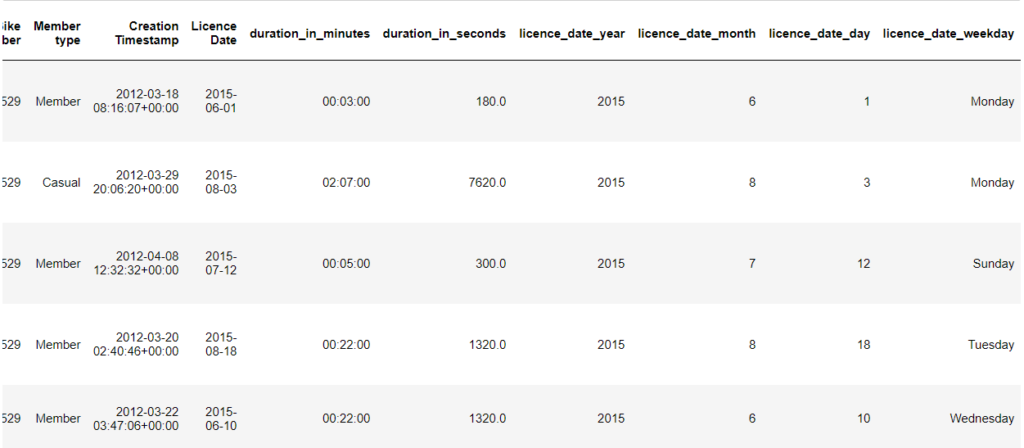
Aggregation
One of the most important approaches in EDA is the aggregation process. Similar to Groupby we will use resample which is very powerful for aggregating time-series data according to every month, day, or quarter. Let’s see!
Now, we will get the average duration for every month.
For full resample documentation please check resamble documentation
rides.resample('M', on = 'Start date')['duration_in_seconds'].mean()
We can go deeper to the level of days. (Note: We will plot the result directly as it will be more visually appealing)
rides.resample('D', on = 'Start date')['duration_in_seconds'].mean().plot()
You may have noticed that the 20th of Oct has an extraordinary value. It may be an outlier.
By now, you have got the different aspects of handling DateTime objects from the data type handling to the basic feature engineering and data manipulation of dates.

